Showing posts with label Tips n Tricks. Show all posts

Tuesday, 27 August 2013

Play LAN game using Wireless LAN....(Example :-NFS Mostwanted ) on Windows 7

Well,most  of them think  WLAN is only used for internet because of those commonly know  tag"WIFI enabled"...But there are many more  possibilities...

U can also play multiplayer lan games by connecting 2 computer using ad hoc facility in ur PC with windows 7
Let me explain in detail..

Things u need beofre playing a Multiplayer game via a wireless network...
1)A PC with WLAN (most of the Laptops now carry a built in WLAN)
2)A game with multiplayer capability

Thats all!!

Follow these steps:

1)Switch on ur WLAN(wifi)
2)Now u have to create a WLAN ad hoc network.
Go to control panel
3)Network and sharing center--->Setup a connection or Network..
4)A new window pops up....scroll down u'll see SETUP AD HOC Network,click on it
5)and click on  Next...

6) It will ask for the name of the network..give a name of ur choice...for a instance take it as ABC
7) In the password block ,enter the password of the network(ull need this password to connect to ur PC from other PC)

8)Set Authentication type to WEP

9)check the SAVE THIS NETWORK box

And click on next  and finally a Wlan network is ready to get connected....(The first time u set up a network,it will automatically initiates the network,but for the second time u need to do it manually,ill explain it at last!!)

So now the server is ready to accept connections from other computer...

Now  on the second PC...  Switch on it's WIFI(wlan)  and a the right-lower corner u'll find a icon in notification area like a computer monitor...when u click on it,a small window above it popups,its the network manager....it will display all the wifi networks which is in the range of ur PC....  And the network that u create in the first PC...i.e ABC will appear on here..click on it and select CONNECT.... it will ask for the password..enter the password which u gave while creating the network....and hit enter......Well it done now both of ur PC are connected...

Now u can share files,data,music,play games..etc etc...


As for gaming...Example NFS most wanted go to --->LAN play ...--->create a  game server(press 1)  give a name and wait for other to join ..


Next on the other PC which u connect it to ur PC,open NFS game go to lan play ,u can see the game server on the list...ENTER ..input ur name....and OK


Then go to SESSION GAME and ENTER


again Enter ...then u will enter the game room....then lock down and  ur ready to play  the game!!!


EnJoY


The next time u need to connect to the ABC network ..follow these steps

On the right-lower corner u'll find a icon in notification area like a computer monitor...when u click on it,a small window above it popups,its the network manager....it will display all the wifi networks which is in the range of ur PC....  And the network that u create in the first PC...i.e ABC will appear on here..click on it and select CONNECT.... it will ask for the password..enter the password which u gave while creating the network....and hit enter......Well it done now both of ur PC are connected...

Saturday, 27 July 2013

How To Remove Send Feedbacklink from Windows 7 Title Bar?

Windows 7 is in beta mode and Microsoft is looking for feedback, fair enough, however many users are irked to see the Send Feedbacklink in the title bar of all the windows, Minty White talks about a registry hack that will allow users to remove the Send Feedbacklink from Windows 7 title bar.

Wednesday, 24 July 2013

Display Multiple Clocks For windows Vista

If you're a frequent traveler or have friends or family in another time zone, you can set up Vista to display multiple clocks at once. Click on the clock in the Start bar, then click "Change date and time settings"¦," and then the Additional Clocks tab. Check the box next to "Show this clock" for each additional clock you want to add, then specify the time zone and display name for each clock. After you apply your changes by clicking OK, clicking on the clock in the Start bar will show you the clocks for every time zone you've selected.

Change Preinstalled Vista Features For Windows Vista

If you don't think you'll ever use preset features like Remote Differential Compression, the Microsoft .NET Framework 3.0 XPS Viewer, or Windows Meeting Space—or if you really need a simple telnet client—it's easy to remove or add them. Go to the Control Panel, click on "Uninstall a program," and select "Turn Windows features on our off." Then just click on the checkboxes to add elements you need—and lose those you don't.

Find things now with Instant Search For Windows Vista

You don't have to open up a special window to find the files or programs you're looking for. Just hit the Windows key or click the Start button and start typing—Vista will present you organized lists of the top files and programs that match the text you've entered. (If you want to see Vista's full findings, click on the "See all results" link at the bottom of the Instant Search window.)

Windows Mobility Center For Windows Vista

Sorry, desktop users, this one's just for the notebook folks. The Windows Mobility Center, which you access by pressing Windows key+X, gives you the opportunity to tweak all sorts of settings on your laptop, all in one convenient place. You can change your display brightness, adjust the volume, check your battery status, turn off wireless connectivity, switch your screen orientation, set up an external display, and more.

Improve Program Access with Quick Launch

The Quick Launch toolbar doesn't get a lot of respect, but it's a great way to launch your regular apps faster. If the toolbar isn't visible, right-click on the Start bar, select Toolbars, click on Quick Launch to add it, and then drag programs or shortcuts to it. You can start programs instantly just by clicking or, better yet, use the Windows key. Windows key+1 will open the leftmost program, Windows key+2 the next one, and so on, up to 10 (the 10th opens with Windows key+0)


WINDOWS XP FUNNY TRICKS

1. You always win while playing solitair
Click start button, . All programes..... games,..... solitair.
Now press Alt+Shift+2 at same time.
No need to play........ you are winner.

2. windows hidden music
when you install fresh windows xp, at the startup you listen a music. after pressing "finish" music stops.
but even now you can listen this secrete music again.
Go to run and type "oobe" and press enter.
you will see a window., double click on image folder.  At the end you will find a music file namely "title"
double click on it and enjoy the windows hidden music........

How to create a "secure" password protected USB

Step 1: Step 1: Make it "secure"

Captura de pantalla 2010-07-21 a las 17.27.42.png
Captura de pantalla 2010-07-21 a las 17.28.14.png
First, go to applications, utilities and open disk utility.
Then, click on "new image" and type in whatever name you want to save it with.
make sure  its set in read/write and in AES 128 bit encriptation.
next, it will ask you for a password, type in your selected password and click "ok".

Try it on your own risk

How to create a Password Protected Folder in Windows 7

  • Create a new folder and name it whatever you would like.
  • Open the folder, right-click on a blank area in it, then select New -> Text Document from the pop-up menu.
  • Open the text file you just created by double-clicking it and copy/paste in the following text:
    cls
    @ECHO OFF
    title Folder Private
    if EXIST "Control Panel.{21EC2020-3AEA-1069-A2DD-08002B30309D}" goto UNLOCK
    if NOT EXIST Private goto MDLOCKER
    :CONFIRM
    echo Are you sure you want to lock the folder(Y/N)
    set/p "cho=>"
    if %cho%==Y goto LOCK
    if %cho%==y goto LOCK
    if %cho%==n goto END
    if %cho%==N goto END
    echo Invalid choice.
    goto CONFIRM
    :LOCK
    ren Private "Control Panel.{21EC2020-3AEA-1069-A2DD-08002B30309D}"
    attrib +h +s "Control Panel.{21EC2020-3AEA-1069-A2DD-08002B30309D}"
    echo Folder locked
    goto End
    :UNLOCK
    echo Enter password to unlock folder
    set/p "pass=>"
    if NOT %pass%== PASSWORD_GOES_HERE goto FAIL
    attrib -h -s "Control Panel.{21EC2020-3AEA-1069-A2DD-08002B30309D}"
    ren "Control Panel.{21EC2020-3AEA-1069-A2DD-08002B30309D}" Private
    echo Folder Unlocked successfully
    goto End
    :FAIL
    echo Invalid password
    goto end
    :MDLOCKER
    md Private
    echo Private created successfully
    goto End
    :End
  • In the above code, replace the key PASSWORD_GOES_HERE with the password you want to use to unlock the folder. For example if you want the password to be 123456, the line should look like:
    if NOT %pass%== 123456 goto FAIL
  • Save your new file in the .bat format with the complete file name being locker.bat. To do this, make sure to change the Save as type: to All Files (*.*).
  • In the folder you created back in Step #1, double click the locker.bat file and there will now be a new folder named Private where you can put anything you want.
  • Upon exiting, double click the locker.bat file again. It will prompt you to answer whether you want to lock your folder or not. Press Y and the private folder will disappear.
  • In order to retrieve the Private folder, all you have to do is double click the locker.bat file and enter the password which you set in Step #4 and the folder will appear again for you to access.

  • Read more at http://www.simplehelp.net/2010/11/29/how-to-create-a-password-protected-folder-in-windows-7/#IuRkJFU5VLvXJDh8.99 

    Tuesday, 23 July 2013

    How To Create A Password Protected Folder Using Notepad

    It's been a long time since I posted something on my blog. Today I'm going to teach you how to create a password protected folder. It's free and you don't need some kind of special software to do it. So we're going to create the folder using a simple coding on Notepad. Since not everyone know coding, I already provided the code, all you need to do is copy it. So kind of me, right? It's only working on Windows, I already tested it on Windows 7, and some friends of mine have it tested on Windows XP.

    What you need to do:

    1.  Create a random folder with random name somewhere on your computer (for example, on your Desktop).
    2.  Open Notepad and paste this code to your Notepad
    @ECHO OFF
    title Folder Private
    if EXIST "Control Panel.{21EC2020-3AEA-1069-A2DD-08002B30309D}" goto UNLOCK
    if NOT EXIST Private goto MDLOCKER
    :CONFIRM
    echo Are you sure you want to lock the folder(Y/N)
    set/p "cho=>"
    if %cho%==Y goto LOCK
    if %cho%==y goto LOCK
    if %cho%==n goto END
    if %cho%==N goto END
    echo Invalid choice.
    goto CONFIRM
    :LOCK
    ren Private "Control Panel.{21EC2020-3AEA-1069-A2DD-08002B30309D}"
    attrib +h +s "Control Panel.{21EC2020-3AEA-1069-A2DD-08002B30309D}"
    echo Folder locked
    goto End
    :UNLOCK
    echo Enter password to unlock folder
    set/p "pass=>"
    if NOT %pass%== hitechnologic goto FAIL
    attrib -h -s "Control Panel.{21EC2020-3AEA-1069-A2DD-08002B30309D}"
    ren "Control Panel.{21EC2020-3AEA-1069-A2DD-08002B30309D}" Private
    echo Folder Unlocked successfully
    goto End
    :FAIL
    echo Invalid password
    goto end
    :MDLOCKER
    md Private
    echo Private created successfully
    goto End
    :End

    3.  Change the word hitechnologic (the word I marked in red from the code), to your desired password. (For example: ilogitech)
    4.  Save As or Press (Ctrl + S) and name it "private.bat" (without the quotation marks), then click on the "Save as Type" option and choose "All Files (*.*)". Save it on the random folder that you created earlier.
    5.  Close the notepad and open the folder that you created earlier, there should be some program named "Private.bat" that you created earlier, click on it and it should create a new folder named "Private" by itself. Do not change the folder name, as it may caused error.
    6.  Now you have a random folder with a folder inside of it named "Private", put some private things maybe a pictures, videos, or anything in to the "Private" folder.
    7.  When you're done, click twice on the "private.bat", and it should give you the option to lock the folder. Press "y" to lock the folder, don't be surprise once you agree to locked the folder, the "Private" folder will disappear along with anything you put inside of it.
    8.  To spawn the folder, you need to click on the "private.bat" and enter your password, then the folder will spawn by itself. To lock and make the folder disappear again, all you need to do is click on the "private.bat" and an option appear that told you if you want to lock the folder again, you must press "y".
    9.  Done and enjoy, don't forget to subscribe to my blog!

    HOW TO DISABLE RIGHT MOUSE BUTTONS FOR YOUR BLOGGER

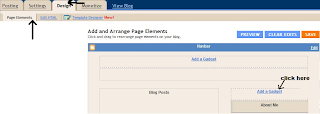
    1. First thing you need to sign in your blog Dashboard, go to Design and click on Add a Gadget.


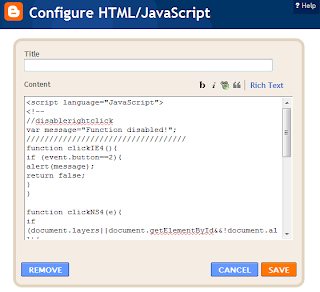
    2. Now choose the HTML/JavaScript gadget.


    3. For the final step place this piece of code inside:


    <script language="JavaScript">

    <!--

    //Disable right mouse click Script

    var message="Function Disabled!";

    ///////////////////////////////////

    function clickIE4(){

    if (event.button==2){

    alert(message);

    return false;

    }

    }

    function clickNS4(e){

    if (document.layers||document.getElementById&&!document.all){

    if (e.which==2||e.which==3){

    alert(message);

    return false;

    }

    }

    }

    if (document.layers){

    document.captureEvents(Event.MOUSEDOWN);

    document.onmousedown=clickNS4;

    }

    else if (document.all&&!document.getElementById){

    document.onmousedown=clickIE4;

    }

    document.oncontextmenu=new Function("alert(message);return false")

    // -->

    </script>

    HOW TO LOGIN IN WINDOWS 7

    Hello friends, today the post is to automatically login in to your computer without asking the user login page. That means you can have more than one user in your computer but you usually use only one account daily means you can set that account as auto login so that you need not to login every time you switch on your computer. Here are the steps:

    Step 1: Login into your account and then click “Start” menu and then type “Netplwiz” and press Enter.

    Step 2: A User account box will appear, which shows the user names of your computer. 


    Step 3: Then click the name of the username which is to auto login. And then uncheck the box above the ser name “Users must enter a username and password to use this computer”then press “OK”.

    Step 4: Then it will ask you username and password. After enter username and password click “Ok”.

    Computer tips and tricks - Gunaseelan SEO


    Step 5: To check restart your computer, it will not ask you the login credentials.

    CONTROL YOUR ANDROID PHONE FROM YOUR COMPUTER

    Hello friends, hope you are all fine. Nowadays most of us use android phone and me too so I searched through online to control my mobile from my computer, in that way I found one way. You can ask me is it possible and even simple? The Answer is YES! You can by an simple application which is free in the market called “Airdroid”.

    Why I choose this?
     There are many free applications in android market to control and connect your android phone with PC without cable. But the main problem is they uses more memory from your phone so it causes mobile hanging and slows down our phone software processing speed. In this way “AIRDROID” uses very less memory to process this so there is nothing affected by this application.

    http://www.2012-tricks.blogspot.com


    Steps to follow:
    Step 1: Download and Install “AirDroid” application on your Android Device from android market, its fully free application.


    Step 2 : After installing Airdroid on your device simply Run it and you will see the screen like the above page. In this you can see the URL(ip address)  and password field.
    Step 3: Now you are successfully installed your apps, and ready to connect with you computer. For this you need a web browser.
    Step 4: Then open your browser and enter the URL(ip address with port) you see in your Airdroid Device App in your web browsers field like below and hit enter.


    Step 5: After you hit enter the new Airdroid will page and prompt you to enter PASSWORD, So you have you enter your password which you seen in your Airdoid Device application. Then click Login.
    Step 6 : Now you are ready to Control you android device from your PC. Just control everything. ….

    See you in the next post.  Thanks for watching this friends…..


    Use a picture password to log into your computer

    Windows 8 includes a new feature called Picture password, which allows you to authenticate with the computer using a series of gestures that include circles, straight lines, and taps. Enable this feature if you want a new way to access your computer or have a hard time with passwords.
    1. Open the Windows Charms.
    2. Click Settings and then More PC settings
    3. In the PC settings window click Users and then select Create a picture password
    Bonus tip: A four digit pin password can also be created and used to access your computer.

    Follow Now......!

    You might like this

    Click Here Please

    Ads 468x60px